Unsurprisingly, creative people have developed a variety of ways of storing their glass rods. Favourite methods include cardboard postal tubes, drainpipes, vases and vegetable racks. I myself have up until now been using a rather nifty Plastic Guttering/Wine Rack Combo, which has served me pretty well. However, every beadmaker knows that beadmaking is not just about the beads. Oh noooooo... most of us eventually add a second hobby to our repertoire: Glass Collector.
When I began lampworking just over two years ago I set myself up with an Effetre Studio Pack of some 49 colours. I was able to justify this fairly substantial investment, because in actual fact I wouldn't need to buy any more glass for years. Err... hello?? Why did no-one warn me that "needing" new glass and "buying" new glass are activities that are in no way related to each other?!
I discovered Vetrofond, with all their fabulous odd-lot colours. Frog Pond. Wasabi. Painted Desert. Delicious!
Then I discovered Lauscha clear; the very best crystal clear glass there is, in my opinion.
Then I found CiM colours, whose rods have a lovely sheen.
Soon after I was smitten by the ASK range, and am still eeking out some of my favourite colours now that the glass is no longer produced.
Double Helix silver glasses now have me in their thrall, closely followed by TAG and Northstar.
I'm itching to try the Reichenbach colour palette too.
Now I'm no mathemetician, but even I can hazard a guess that with the amount of glass I own I shouldn't actually "need" to buy more until 2038. For the avoidance of doubt that's the year two thousand and thirty eight. However, I may as well come clean and tell you that if I last until 20:38 tonight I'll have achieved something. Yes, I am obsessed. Completely and utterly.
So, my glass collection is growing, and the wine rack no longer cuts the mustard. What to do? Clearly ceasing to buy more glass is not an option. In fact I get the shivers just thinking about it. The only answer is to build more storage. Bigger, better storage! Yes, this is what I need. Bigger and better, with room for expansion. Embrace the obsession!
This time I have gone for the Quality Downpipe Model, and because I know my fellow beadmakers are as occupied with storing their Glass Collection as I was, I thought I would share how it was built. As a picture paints a thousand words, here it is step-by-step, in pictures.
First I had to acquire 80 metres of 6.5cm square downpipe. Yes, that's not a typo. Eighty metres! As luck would have it one of my neighbours has a plastic extruding company, and was able to supply me with exactly what I needed, and even cut it to 40cm lengths. Thanks Dave!
Next, it all had to be unpacked, and cleaned of all the swarfy bits. Then the protective plastic covering had to be peeled off. It took ages, but sitting in the sunshine to do it made it more bearable.
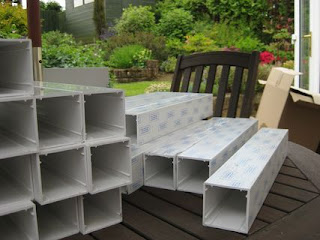
I decided to build four separate modules, each made up of seven compartments by seven compartments. At this point I went all girly, and couldn't fathom how to get it all squared up. My tactic worked perfectly, and my hubby became so exasperated with my feeble efforts that he decided it was men's work. I watched, from underneath my parasol on the patio. It was tiring watching all this activity!

The pipes were glued together with silicone glue, and then checked to ensure they were neatly aligned with a set square and spirit level. I'd have just checked they looked about right, so it's probably for the best that I wasn't left in charge of such an important task.

More layers, and more spirit levelling.

And here is the first one, all finished, except for the heavy card that was glued to the back to stop the rods slipping out of the back.

Two days of drying later, and today I've finally been able to move my glass to its Luxury Accommodation. I have 196 compartments, and it's about three quarters full. I've agonised over the order I should store it in, but have opted for the "approximate rainbow" scheme. Today has been a voyage of discovery as I've found colours that were long-buried and that I had completely forgotten I owned!

I keep popping into my studio to have another look. This new storage system has made my glass so much more accessible and consequently so much more easily strokable, and this can only be a good thing!
 This is the bit where the credits roll up the screen, so I should like to thank "Silicone Dave from Over the Road" for providing the materials, and my lovely hubby for transforming it from 80 metres of 6.5cm downpipe into the Luxury Glass Accommodation that it is now!
I keep popping into my studio to have another look. This new storage system has made my glass so much more accessible and consequently so much more easily strokable, and this can only be a good thing!
This is the bit where the credits roll up the screen, so I should like to thank "Silicone Dave from Over the Road" for providing the materials, and my lovely hubby for transforming it from 80 metres of 6.5cm downpipe into the Luxury Glass Accommodation that it is now!

 The article has been given a full page, with pictures of the jewellery I created for the auction in February, and of the orphan elephants in the care of the